A Complete Guide to the House Construction Process in Sri Lanka
Building a house is one of the biggest decisions your family will ever make. If you are planning to build a home in Matale, Kandy, Gampola, Akurana, or anywhere in Sri Lanka, this guide will walk you through every step of the house construction process. We have kept it simple so that anyone can understand what happens from start to finish.
Many families in Sri Lanka worry about the house building steps because they have never done it before. Questions like "Where do I start?" and "How long will it take?" are very common. The truth is, when you know the full construction process step by step, everything becomes much easier. You can plan your budget, avoid delays, and make sure your new home is built the right way.
At Unicon Construction, we have helped many families across the Central Province build their dream homes. Below are the 11 main house building steps in Sri Lanka that every homeowner should know.
Step 1: Land Selection & Soil Testing
The first step in the house construction process is choosing the right land. Not every piece of land is good for building. You need to check a few things before you buy. Is the land on flat ground or a slope? Is there road access? Can you get water and electricity connections easily?
Once you have your land, the next important thing is soil testing. This is where engineers check how strong the ground is. If the soil is weak or too sandy, the foundation design will need to be stronger. Soil testing costs a small amount, but it can save you lakhs of rupees later by preventing foundation problems. Never skip this step.
Step 2: House Plan & 3D Design
Now it is time to design your house. You will work with an architect or a construction company like Unicon to create a house plan that fits your land, your family size, and your budget. The plan will show all the rooms, doors, windows, and measurements.
Today, most good construction companies also provide a 3D design. This is like a realistic picture of your future home. You can see exactly how the outside will look and how the rooms are arranged inside. This helps you make changes before construction starts, which saves both time and money. A good house plan is the foundation of a smooth house building process.
Step 3: Getting Building Permits & Approvals
In Sri Lanka, you cannot start building without the proper approvals. Depending on where your land is, you may need permission from your local Pradeshiya Sabha (local council) or the Urban Development Authority (UDA). If you are building in a city area, UDA approval is usually required.
The approval process involves submitting your house plan, structural drawings, and other documents. This can take a few weeks to a couple of months. Many families find this step confusing, but a good construction company will handle the entire approval process for you. At Unicon, we manage all the paperwork so you do not have to run from office to office.
Step 4: Site Preparation & Foundation
Once you have your approvals, actual construction begins. The first job on site is clearing the land. Workers will remove trees, rocks, and level the ground. Then, the most important part of the entire house construction process begins -- the foundation.
The foundation is what holds your entire house. Based on the soil test results and the structural design, the engineers will decide which type of foundation is best. Common types in Sri Lanka include strip foundations and pad foundations. Workers will dig trenches, lay reinforcement steel, and pour concrete. If the foundation is done right, your house will stand strong for generations.
Step 5: Wall Construction (Brick/Block Work)
After the foundation is set and cured, the walls go up. This is when your house starts to actually look like a house. Masons will lay bricks or cement blocks row by row using mortar. Most homes in Sri Lanka use cement blocks because they are affordable and strong.
During this stage, door frames and window frames are also placed. The engineers will make sure every wall is straight and level. Proper wall construction is very important for the strength and durability of your home. Columns and beams are also built at this stage to provide the structural support your house needs.
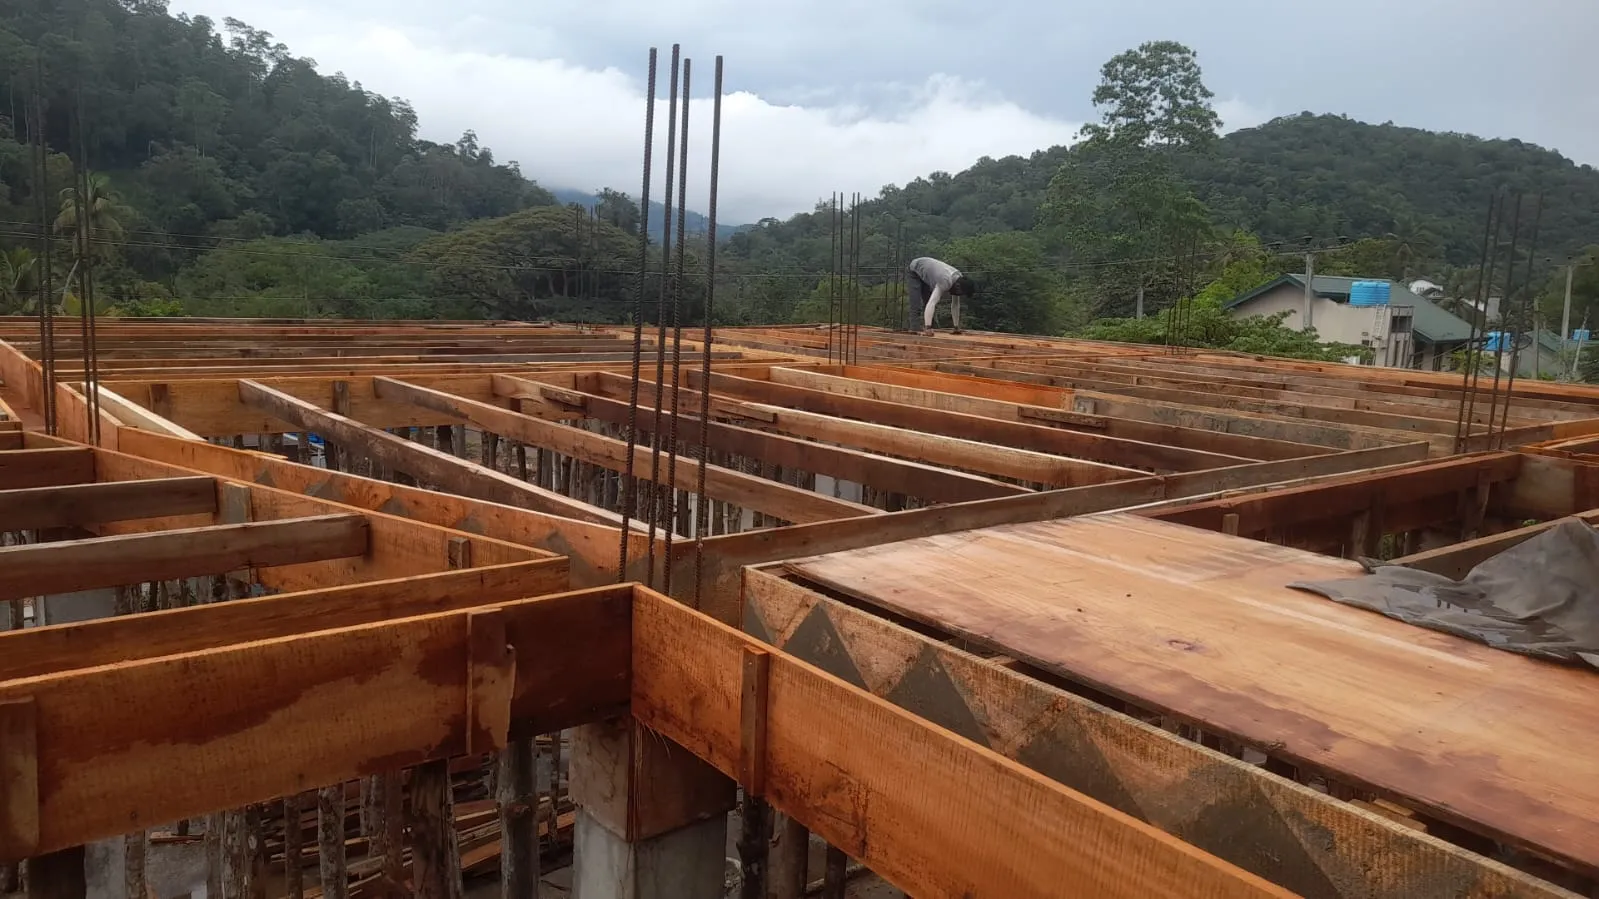
Step 6: Roof Slab & Roofing
The roof slab is a major milestone in the house building steps. This is where steel reinforcement bars are tied together on timber formwork and concrete is poured on top. A roof slab is a big job, and it usually takes one full day of continuous concrete pouring.
After the slab is cured, the roofing work begins. In Sri Lanka, most houses use either clay tiles or asbestos-free roofing sheets. Some modern homes go with flat concrete roofs. The roof protects your home from rain and sun, so it must be done carefully. Waterproofing is also applied at this stage to prevent any leaks in the future.
Step 7: Plastering & Rendering
Once the structure is complete, the walls need to be plastered. Plastering means applying a smooth layer of cement mortar on both the inside and outside walls. This gives the walls an even surface and gets them ready for painting later.
Good plastering takes skill. If the plastering is not done properly, you will see cracks and uneven patches after painting. Experienced masons will make sure the walls are perfectly smooth. After plastering, the walls are left to cure and dry for some time before the next steps.
Step 8: Plumbing & Electrical Work
Plumbing and electrical work actually start early in the construction process. Pipes and wires are laid inside the walls before plastering. But the final connections and fittings are done at this stage.
For plumbing, this includes installing the water supply lines, drainage pipes, bathroom fittings, kitchen sink, and water tank connections. For electrical work, this includes wiring, switch boxes, plug points, light fittings, and the main electrical panel. It is very important to use quality materials and licensed electricians for safety. Plan your switch and plug point locations carefully, as changing them later is difficult and expensive.
Step 9: Floor Tiling & Finishing
Floor tiling is one of the most visible parts of your new home. You get to choose the tiles for each room -- living room, bedrooms, kitchen, bathrooms, and outdoor areas. There are many options available in Sri Lanka, from affordable ceramic tiles to polished porcelain and granite tiles.
The tiling team will lay the tiles on a prepared cement base and use a levelling system to make sure everything is perfectly flat. After the tiles are set, they are grouted and cleaned. Good floor tiling makes a huge difference in how your house looks and feels. This is also when wall tiles for bathrooms and kitchen backsplashes are installed.
Step 10: Painting & Final Touches
Painting brings your house to life. Before painting, the walls are sanded smooth and a primer coat is applied. Then, two or more coats of emulsion paint are applied on the inside walls, and weather-resistant paint is used for the outside. You can choose any colour combination you like.
Along with painting, the final touches are done at this stage. This includes installing doors, windows, cupboards, kitchen cabinets, staircase railings, and any other woodwork or aluminium work. Landscaping, driveway paving, boundary walls, and gate installation are also completed. These final touches are what turn a construction site into your beautiful new home.
Step 11: Inspection & Handover
The last step in the house construction process is the final inspection. The construction team will carefully check every part of the house. They will look at the structure, plumbing, electrical work, tiling, painting, and all fittings to make sure everything is up to standard.
If there are any small issues -- a leaking tap, a scratch on a tile, or a touch-up needed on the paint -- they will be fixed before the handover. Once everything is perfect, the keys are handed over to you and your family. This is the moment you have been waiting for. Your dream home is ready.
How Long Does the House Construction Process Take?
A typical house in Sri Lanka takes about 6 to 12 months to build, depending on the size and design. A simple single-storey house can be finished in about 6 months. A two-storey house with more complex designs may take 10 to 12 months. Weather conditions, material availability, and the size of the work crew can also affect the timeline.
Tips for a Smooth House Building Process
- Choose a reliable construction company -- Do not just go with the cheapest option. Check their past projects and talk to their previous clients.
- Get a proper BOQ (Bill of Quantities) -- This gives you a clear breakdown of all costs before construction starts. No surprises later.
- Do not skip soil testing -- It is a small cost that prevents big problems.
- Visit the site regularly -- Stay involved and check the progress often.
- Use quality materials -- Cheap materials may save money now but will cost more in repairs later.
- Keep some extra budget -- Always keep 10-15% extra for unexpected costs.
Understanding the house building steps in Sri Lanka helps you make better decisions and stay in control of your project. Whether you are building in Matale, Kandy, Gampola, or Akurana, the construction process is the same. What matters most is having the right team by your side.
Frequently Asked Questions
What are the main steps in house construction in Sri Lanka?
The 11 main steps are: land selection and soil testing, house plan and 3D design, building permits, site preparation and foundation, wall construction, roof slab, plastering, plumbing and electrical work, floor tiling, painting and final touches, and inspection and handover.
How long does it take to build a house in Sri Lanka?
A simple single-storey house takes about 6 months. A two-storey house with complex designs may take 10-12 months. Weather, material availability, and crew size affect the timeline.
Do I need building approval to construct a house in Sri Lanka?
Yes, you need approval from your local Pradeshiya Sabha or Urban Development Authority (UDA) before starting construction. You must submit house plans, structural drawings, and other documents.
What is soil testing and why is it important?
Soil testing checks how strong the ground is before building. If the soil is weak or sandy, the foundation design needs to be stronger. This small investment prevents costly foundation problems later.
Ready to Start Building Your Home?
Talk to our team and get a free consultation for your house construction project. We serve Matale, Kandy, Gampola, Akurana and all areas in the Central Province.
Get Free Consultation